
READY TO START?
YOU WILL NEED TO HAVE
A WORKING KNOWLEDGE OF PSP AND ANIMATION SHOP (AS).
THANK YOU TO THE TALENTED CREATORS OF MY SUPPLIES
SUPPLIES NEEDED:
You will need 2 tubes of choice by the same artist. I'm using the wonderful artwork of Suzanne Woolcott. You must by a license to use her work: HERE
My supplies (includes the kit (with permission from the designer), Bat animation, and diamond): HERE
MASK OF CHOICE
GLITTER ANIMATION by NMS: HERE
FONT OF CHOICE. I'm using walking the witch available: HERE
WRITTEN IN PSP X
Open new a 600x600 canvas. Flood fill white.
Select a paper from kwl's kit. I chose grungepaper5. You will need to resize it to 600x600 pixels and paste as a new layer. Apply your mask.
Choose a frame1 from the kit. paste as new layer and duplicate it.
Other elements I chose from the kit are: charm4, element2, element5, flower, frame3, grungepaper1, and any of the ribbons. You can choose the same elements
or different ones
Apply your first tube between the frames to the right of the frames and erase the portions of the top frame that cover the top of the tube so it appears the tube is inside the frame.
Use my tag as a guide for the placement of all your other elements. resize them and get them where you want them.
apply all your other elements. If you chose the ribbons, place it on the left of the frame over the top frame, duplicate it, and mirror. Make sure your tube is in front of your right hand ribbon.
Place your second frame (frame 3) below the tube layer.
add your second paper. grab your magic wand and click inside the frame. SELECTIONS:MODIFY:EXPAND BY 3, SELECTIONS:INVERT. Click on your paper and hit the delete key on your keyboard.
Add your second tube and position it in frame3 to where you want it. repeat the above step, clicking on the tube layer and hitting delete. Lower your opaquacy on your tube to: 55.
Select your font tool, choose walking the witch stroke:black and stroke width:1, fill: #d9d9d9. Type your name out and position it to the top of your canvas. (use mine as a guide).
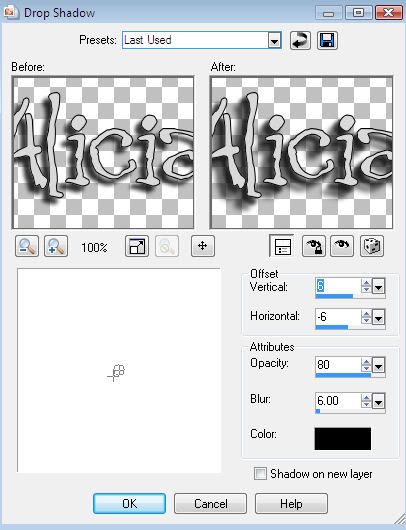
Add drop shadows where you want them. I used the following drop shadow for all mine:
Add your copyright information
Open animation shop. Copy merged your creation from PSP and paste as new animation in animation shop.
duplicate your canvas 10 times (10 frames) in animation shop.
Open your bat glitter file.
click on the first frame of your bat glitter and hit CONTROL A then CONTROL C on your keyboard.
Now, click on the first frame of your canvas and hit CONTROL A then CONTROL E on your keyboard.
Position your glitter bat where you want it on the canvas and hit the left button on your mouse to paste it there.
resize your animation and save it as a new GIF file.
I hope you enjoyed this tut!

written by Merrilee Finney
©DezinesbyMerr
DO NOT COPY, please link to this site to share.
This tutorial is for personal use only, you may not profit from it.


0 comments:
Post a Comment