
READY TO START?
YOU WILL NEED TO HAVE A GOOD WORKING KNOWLEDGE OF PSP AND ANIMATION SHOP (AS).
THANK YOU TO THE TALENTED CREATORS OF MY SUPPLIES
SUPPLIES NEEDED:
Sky Blue scrap kit by Dez of The Sound of Madness. You can get it: HERE
You will need a tube of choice. I'm using the wonderful artwork of Suzanne Woolcott. You must by a license to use her work: HERE
My supplies (includes the heart rain animation only): HERE
FILTERS: FILTERS UNLIMITED 2.0 AND MURA MEISTER'S CLOUD
FONT OF CHOICE.
WRITTEN IN PSP X
Open new a 350x350 canvas. Flood fill white.
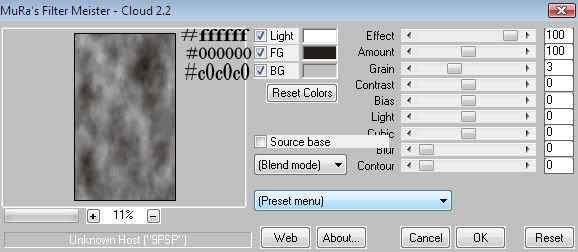
Add a new raster layer and flood fill it #211d1a and apply mura's meister cloud filter at the following settings:
Then while the dark cloudy layer is still selected, apply the second filter: filters unlimited 2.0>Edges, square>Square Edge 04 at it's default settings
*OPTIONAL* On the very bottom of the canvas, select a font of choice and type "please don't rain on me"
Select a frame from the kit. Resize it and set it to the right hand side of your canvas. Add whatever embellishments you want around the frame.
Select the cloudy blue sky paper from the kit and apply that below your frame layer.
Grab your magic want and select inside your frame: SELECTIONS>MODIFY>EXPAND BY 3: SELECTIONS>INVERT. Click on the sky paper layer and hit delete your your keyboard. SELECTIONS:SELECT NONE.
Hide your frame layer, merge visible the white background, the dark cloud layer, the blue cloud layer and the layer with the typed phrase.
unhide your frame layer add a drop shadow to it (V:6 H:-6 O:80 B:6 COLOR: black) and add your tube the left of the frame. Add your copyright info along with it.
Hide your merged layer and merge visible your frame, copyright, and your tube layer.
Add a new raster layer for the name you want to it.. merge it to the frame layer if you want to.
Select the bottom merged layer (the cloud layer) and copy it to animation shop. Paste in animation shop as a new animation.
Open the heart rain animation in animation shop and resize it by 135% Duplicate your cloud layers 5 frames. Click on your first frame of your heart animation and
CONTROL A (SELECT ALL) & CONTROL C (COPY ALL), Then click on your first frame of yourcloud layers and CONTROL A (SELECT ALL) & CONTROL E (PASTE ALL) and position it
over the blue square. Paste it by clicking your mouse.
Go back to PSP, hide your cloud layer and select the name and tube/frame layers COPY MERGED.
Then, go back to Animation Shop and paste this as a new animation. Duplicate it 5 frames and use the same technique as above to copy and paste it over the hearts and clouds (match it perfectly)
save it as a new GIF.
I hope you enjoyed this tut!

written by Merrilee Finney
©DezinesbyMerr
DO NOT COPY, please link to this site to share.
This tutorial is for personal use only, you may not profit from it.


0 comments:
Post a Comment